前言
本教程因考慮到驅動兼容性、操作易用性、軟件生態等諸多因素,將以Ubuntu24.10爲例,親測亦可應用於Ubuntu24.04LTS上,其它Linux發行版的gnome桌面環境大同小異,大部分情況只需要將apt替換成相應的包管理器(如dnf、zypper、pacman)即可。本教程將涵蓋基本使用環境的配置,基本美化配置,遊戲配置。默認讀者已經完成了安裝系統。
基本配置
軟件源
如果你在安裝時選擇了中文以及中國上海時間,那麼Ubuntu默認會選擇中國軟件源。如果你不放心可以打開“軟件和更新”檢查一下。其它Linux發行版需要自行必應一下換源方法。
打開終端然後執行以下代碼,並輸入密碼
sudo apt update && sudo apt upgrade -y && sudo apt autoremove -y && sudo apt autoclean -y && sudo snap refresh
完成後重啓系統。
一些工具
打開終端然後執行以下代碼,並輸入密碼
sudo apt install -y ubuntu-restricted-addons ubuntu-restricted-extras gnome-tweaks gnome-shell-extensions vim git wget curl gdebi synaptic
輸入法
這裏我強烈推薦大家使用rime輸入法,雖然它配置起來特別麻煩,但是幸好有其他大神編輯好的配置文件,直接git下來簡單修改一下就好了。
安裝本體
打開終端然後執行以下代碼,並輸入密碼
sudo apt install fcitx5 fcitx5-rime fcitx5-gtk fcitx5-qt fcitx5-im fcitx5-configtool vim
如果系統預裝好了fcitx4那麼會提醒選擇卸載,根據提示卸載即可。
基本配置
先配置一下~/.xprofile避免打字太快出現漏字的情況,打開終端輸入
vim ~/.xprofile
然後按i進入編輯模式,粘貼如下內容
export GTK_IM_MODULE=fcitx
export QT_IM_MODULE=fcitx
export XMODIFIERS="@im=fcitx"
按Esc鍵退出編輯模式,然後在英文狀態下輸入“:wq”(注意是雙引號內的全部內容,含冒號)
核心配置
這裏推薦使用霧凇拼音+萬象語言模型來實現絕佳的輸入體驗
打開終端,依次輸入以下命令:
git clone https://bgithub.xyz/iDvel/rime-ice --depth=1
切換進目錄:
cd rime-ice
實現逗號、 句號翻頁:
sed -i 's/# (- { when: (paging|has_menu), accept: (comma|period), send: Page_(Up|Down) })/\1/' default.yaml
接下來是配置語言模型,通過以下命令來下載萬象語言模型
wget https://bgithub.xyz/amzxyz/RIME-LMDG/releases/download/LTS/wanxiang-lts-zh-hans.gram
然後讓其與霧凇拼音協同,輸入以下命令
vim rime_ice.custom.yaml
然後按i進入編輯模式,粘貼如下內容
patch:
grammar:
language: wanxiang-lts-zh-hans
collocation_max_length: 5
collocation_min_length: 2
translator/contextual_suggestions: true
translator/max_homophones: 7
translator/max_homographs: 7
按Esc鍵退出編輯模式,然後在英文狀態下輸入“:wq”(注意是雙引號內的全部內容,含冒號)
切換出目錄
cd ..
將配置好的文件導入進rime中
cp -r ./rime-ice/* ~/.local/share/fcitx5/rime
如果這條命令執行失敗就先執行一次下面這個命令
mkdir ~/.local/share/fcitx5/rime
然後刪除掉用於編輯的臨時文件夾
rm -rf rime-ice
設置開機自啓動
還記得開頭讓安裝的gnome-tweaks工具嗎?這時候就派上用場了,找到這個軟件然後打開它
優化
進入這裏設置讓Fcitx5開機自啓動
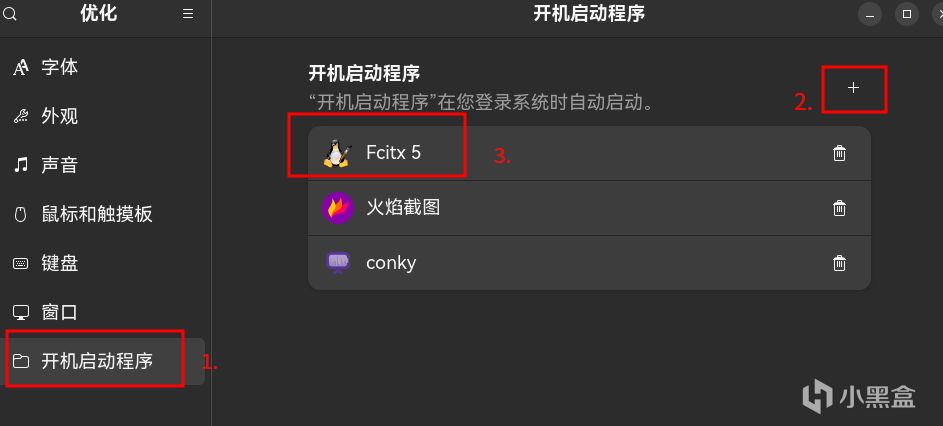
至此,對於輸入法的配置 已經完工了,重啓系統後即可正常使用。
常用軟件與字體
安裝常用軟件
像釘釘、微信、QQ、ToDesk、WPS等這些必備軟件已經有了官方Linux版本,可根據需要去官網下載amd64的deb包到“下載”目錄。接下來是介紹一些大神開發的好用軟件,去release界下載amd64的deb包到“下載”目錄
這個是基於electron的嗶哩嗶哩Linux版https://github.com/msojocs/bilibili-linux/releases/tag/v1.16.2-2
這個是多平臺免費聽歌軟件https://github.com/listen1/listen1_desktop/releases/tag/v2.32.0
這個是多平臺免費好用的下載器https://github.com/agalwood/Motrix/releases/tag/v1.8.19
這個是多平臺燒寫鏡像文件工具https://github.com/balena-io/etcher/releases/tag/v1.19.25
這個是開源好用的解壓工具(kde用戶下載qt版,gnome用戶下載gtk版https://peazip.github.io/peazip-linux.html
然後在“下載”目錄,右鍵在這裏打開終端,輸入以下命令
sudo apt-get install ./*.deb
這裏解釋一下不用dpkg安裝deb包的原因,dpkg安裝就只會安裝deb包裏的東西,不會管依賴什麼的,而用apt工具安裝會一起將軟件依賴安裝上。
安裝常用字體
安裝完微信和WPS後可能會有缺失字體的情況,不過好在這比較好處理
你可以參照其他的教程將Windows的fonts文件夾安裝到Linux中,不過這裏我提供一個比較便捷的方法,
先去這裏將“字體.zip”下載下來並解壓,
https://www.123865.com/s/eHLA-SJ6Ph?
或者
https://www.123684.com/s/eHLA-SJ6Ph?
提取碼:4agU
然後打開終端輸入以下命令,並輸入密碼
sudo mv ./字體/* /usr/share/fonts/
輸入以下命令使更改生效
fc-cache -fv
恭喜,到這裏你已經完成了對Linux的基本配置
美化配置
桌面擴展插件
因爲本文是基於gnome桌面環境進行配置,所以這裏需要裝一些實用插件
去這個網站上根據需要安裝下列插件https://extensions.gnome.org/#

安裝完成後你可以去“擴展”這個軟件裏對插件進行設置,建議將輸入法面板的字體大小調整一下,以及Vitals的位置調整一下。
Ubuntu dock欄
去系統設置裏面按如下設置即可,其他設置項根據自己需要來設置

image-20250128184657323
桌面顯示系統信息
這裏需要用到conky這個強大的軟件,它很強大,受篇幅限制這裏只是基礎地配置一下,如果讀者感興趣可以自己探索一下高級用法。
輸入以下命令安裝conky
sudo apt install conky-all
然後編輯一下配置文件
vim ~/.conkyrc
然後按i進入編輯模式,粘貼如下內容
default_color white
double_buffer yes
no_buffers yes
update_interval 1.0
total_run_times 0
own_window yes
own_window_type normal
own_window_transparent yes
own_window_hints undecorated,below,sticky,skip_taskbar,skip_pager
own_window_colour 000000
own_window_argb_visual yes
own_window_argb_value 0
double_buffer yes
draw_shades yes
draw_outline no
draw_borders no
draw_graph_borders n0
minimum_size 300 1
maximum_width 406
default_color ffffff
default_shade_color 000000
default_outline_color 000000
alignment top_right
gap_x 6
gap_y 5
cpu_avg_samples 2
override_utf8_locale no
uppercase no
use_spacer no
use_xft yes
xftfont WenQuanYi Zen Hei:pixelsize=15
override_utf8_locale yes
use_spacer no
minimum_size 300 1
TEXT
${font LCD:style=Bold:pixelsize=50}${alignc}${time %H:%M:%S}
${font LCD:style=Bold:pixelsize=30}${time %Y年%b%d日 星期%a}${alignc}
${font WenQuanYi Zen Hei:pixelsize=16}
${color #e77c8e}主機名:${color}$alignr$nodename
${color #e77c8e}內核:${color}$alignr$kernel
${color #e77c8e}已開機:${color}$alignr$uptime
${color #e77c8e}負載平均值:${color}$alignr$loadavg
${color #e77c8e}CPU使用率:${color}$alignr$cpu%
${cpubar 4}
${color #e77c8e}CPU佔用:${color}
${top name 1} ${alignr}${top cpu 1}
${top name 2} ${alignr}${top cpu 2}
${top name 3} ${alignr}${top cpu 3}
${color #e77c8e}物理內存:${color}${alignr}$mem / $memmax
${membar 4}
${color #e77c8e}交換分區:${color}${alignr}$swap / $swapmax
${swapbar 4}
${color #e77c8e}根分區: ${color}${alignr}${fs_free /} / ${fs_size /}
${fs_bar 4 /}
按Esc鍵退出編輯模式,然後在英文狀態下輸入“:wq”(注意是雙引號內的全部內容,含冒號)
然後繼續去這裏設置conky的自啓動

優化
重啓後你就可以發現你的桌面上顯示了這樣的界面

美化終端
這裏會涉及到大量的命令,請做好心裏準備
安裝zsh
sudo apt install zsh touch ~/.zshrc chsh -s /usr/bin/zsh
安裝配套字體
wget https://ghproxy.cn/https://github.com/ryanoasis/nerd-fonts/releases/download/v3.2.1/FiraCode.zip
unzip FiraCode.zip -d ~/.local/share/fonts
rm FiraCode.zip
fc-cache -fv
安裝p10k
git clone --depth=1 https://ghproxy.cn/https://github.com/romkatv/powerlevel10k.git ~/powerlevel10k
echo 'source ~/powerlevel10k/powerlevel10k.zsh-theme' >>~/.zshrc
然後將終端字體設置爲FiraCode字體


接着輸入以下命令
zsh
然後根據提示完成個性化配置
安裝zsh插件
這裏特別說明一下Ubuntu源裏面有zsh-autosuggestions和zsh-syntax-highlighting兩個插件,直接用apt安裝即可,但是考慮到其他Linux發行版的用戶(如openSUSE)可能無法通過包管理器安裝這兩個插件。爲了兼容性,這裏我採用的還是git源碼的方式來安裝。
依次執行以下命令:
sudo git clone https://bgithub.xyz/zsh-users/zsh-autosuggestions.git /usr/share/zsh-autosuggestions
sudo git clone https://bgithub.xyz/zsh-users/zsh-syntax-highlighting.git /usr/share/zsh-syntax-highlighting
sudo git clone https://bgithub.xyz/zsh-users/zsh-history-substring-search.git /usr/share/zsh-history-substring-search
echo 'source /usr/share/zsh-autosuggestions/zsh-autosuggestions.zsh' >> ~/.zshrc
echo 'source /usr/share/zsh-syntax-highlighting/zsh-syntax-highlighting.zsh' >> ~/.zshrc
echo 'source /usr/share/zsh-history-substring-search/zsh-history-substring-search.zsh' >> ~/.zshrc
然後使用以下命令使更改生效
source ~/.zshrc
實用配置
sudo apt install eza
vim ~/.zshrc
切換光標到最後一行,按大寫A以從行末開始編輯,然後回車換行,粘貼以下內容
autoload -Uz run-help
(( ${+aliases[run-help]} )) && unalias run-help
alias help=run-help
autoload -Uz run-help-git run-help-ip run-help-openssl run-help-p4 run-help-sudo run-help-svk run-help-svn
autoload -Uz compinit promptinit
compinit
promptinit
HISTFILE=~/.zsh_history
HISTSIZE=1000
SAVEHIST=2000
TIMEFMT=$'\nreal\t%E\nuser\t%U\nsys\t%S\ncpu\t%P'
#Case-insensitive tab completion (match lower and upper case)
zstyle ':completion:*' matcher-list 'm:{[:lower:][:upper:]}={[:upper:][:lower:]}'
zstyle ':completion:*' matcher-list 'm:{a-zA-Z}={A-Za-z}'
#Use colors for completion listings (different colors for directories, files, etc.)
zstyle ':completion:*' list-colors "${(s.:.)LS_COLORS}"
#Enable rehash so new executables in the PATH are automatically found
zstyle ':completion:*' rehash true
#Enable menu selection (highlight options when navigating with tab)
zstyle ':completion:*' menu select
#Automatically accept exact matches in completion, even if partially typed
zstyle ':completion:*' accept-exact '*(N)'
#Enable caching for faster completion, and define the cache path
zstyle ':completion:*' use-cache on
zstyle ':completion:*' cache-path ~/.zsh/cache
#Add auto-description for completion items (shows additional information)
zstyle ':completion:*' auto-description 'specify: %d'
#Specify completion methods: first expand aliases, then complete commands
zstyle ':completion:*' completer _expand _complete
#Format the completion display with a message indicating what is being completed
zstyle ':completion:*' format 'Completing %d'
#Remove group names from completion listings
zstyle ':completion:*' group-name ''
#List prompt for showing how to navigate through completion options
zstyle ':completion:*' list-prompt %SAt %p: Hit TAB for more, or the character to insert%s
#Select prompt for scrolling through completion menu
zstyle ':completion:*' select-prompt %SScrolling active: current selection at %p%s
#Disable the use of older `compctl` completions (use new style completion)
zstyle ':completion:*' use-compctl false
#Enable verbose completion output
zstyle ':completion:*' verbose true
#Custom completion style for `kill` command, listing processes with detailed information
zstyle ':completion:*:kill:*' command 'ps -u $USER -o pid,%cpu,tty,cputime,cmd'
#Set colors for the `kill` command completion (red color for process IDs)
zstyle ':completion:*:*:kill:*:processes' list-colors '=(#b) #([0-9]#)*=0=01;31'
EDITOR=vim
alias c='clear'
alias ls='eza -a --icons'
alias ll='eza -al --icons'
alias lt='eza -a --tree --level=1 --icons'
alias shutdown='systemctl poweroff'
alias v='$EDITOR'
alias vim='$EDITOR'
alias wifi='nmtui'
alias Qtile='startx'
alias gs="git status"
alias ga="git add"
alias gc="git commit -m"
alias gp="git push"
alias gpl="git pull"
alias gst="git stash"
alias gsp="git stash; git pull"
alias gcheck="git checkout"
alias gcredential="git config credential.helper store"
alias update-grub='sudo grub-mkconfig -o /boot/grub/grub.cfg'
alias res1='xrandr --output DisplayPort-0 --mode 2560x1440 --rate 165'
alias res2='xrandr --output DisplayPort-0 --mode 1920x1080 --rate 165'
alias setkb='setxkbmap de;echo "Keyboard set back to de."'
alias cp="cp -i" # Confirm before overwriting something
alias df='df -h' # Human-readable sizes
alias free='free -m' # Show sizes in MB
alias gitu='git add . && git commit && git push'
alias history="history 0"
alias grep='grep --color=auto'
alias fgrep='fgrep --color=auto'
alias egrep='egrep --color=auto'
alias diff='diff --color=auto'
alias rm='rm -i'
alias ip='ip --color=auto'
alias la='ls -A'
setopt correct # Auto correct mistakes
setopt extendedglob # Extended globbing. Allows using regular expressions with *
setopt nocaseglob # Case insensitive globbing
setopt rcexpandparam # Array expension with parameters
setopt nocheckjobs # Don't warn about running processes when exiting
setopt numericglobsort # Sort filenames numerically when it makes sense
setopt nobeep # No beep
setopt appendhistory # Immediately append history instead of overwriting
setopt histignorealldups # If a new command is a duplicate, remove the older one
setopt autocd # if only directory path is entered, cd there.
setopt inc_append_history # save commands are added to the history immediately, otherwise only when shell exits.
setopt histignorespace # Don't save commands that start with space
setopt prompt_subst
setopt interactivecomments # allow comments in interactive mode
setopt magicequalsubst # enable filename expansion for arguments of the form ‘anything=expression’
setopt nonomatch # hide error message if there is no match for the pattern
setopt notify # report the status of background jobs immediately
setopt numericglobsort # sort filenames numerically when it makes sense
setopt promptsubst # enable command substitution in prompt
setopt hist_expire_dups_first # delete duplicates first when HISTFILE size exceeds HISTSIZE
setopt hist_ignore_dups # ignore duplicated commands history list
setopt hist_ignore_space # ignore commands that start with space
setopt hist_verify # show command with history expansion to user before running it
#setopt share_history # share command history data
#Enable emacs key bindings
bindkey -e
#Essential key bindings
bindkey '^[[7~' beginning-of-line # Home key
bindkey '^[[8~' end-of-line # End key
bindkey '^[[2~' overwrite-mode # Insert key
bindkey '^[[3~' delete-char # Delete key
bindkey '^[[C' forward-char # Right arrow key
bindkey '^[[D' backward-char # Left arrow key
bindkey '^[[5~' history-beginning-search-backward # Page Up key
bindkey '^[[6~' history-beginning-search-forward # Page Down key
bindkey '^[[1;5C' forward-word # Ctrl + Right arrow (forward word)
bindkey '^[[1;5D' backward-word # Ctrl + Left arrow (backward word)
#Simplified undo and word deletion
bindkey '^[[Z' undo # Shift + Tab undo
bindkey '^H' backward-kill-word # Ctrl + Backspace
bindkey '^U' backward-kill-line # Ctrl + U
bindkey '^[[3;5~' kill-word # Ctrl + Delete
#History search with up/down keys
bindkey '^[[A' history-substring-search-up # Up arrow
bindkey '^[[B' history-substring-search-down # Down arrow
#Use terminfo for portability (optional, for special cases)
typeset -g -A key
key[Home]="${terminfo[khome]}"
key[End]="${terminfo[kend]}"
key[Insert]="${terminfo[kich1]}"
key[Delete]="${terminfo[kdch1]}"
key[Up]="${terminfo[kcuu1]}"
key[Down]="${terminfo[kcud1]}"
key[Left]="${terminfo[kcub1]}"
key[Right]="${terminfo[kcuf1]}"
key[PageUp]="${terminfo[kpp]}"
key[PageDown]="${terminfo[knp]}"
#Use lesspipe for better handling of non-text files
[ -x /usr/bin/lesspipe ] && eval "$(SHELL=/bin/sh lesspipe)"
ZSH_HIGHLIGHT_HIGHLIGHTERS=(main brackets pattern)
ZSH_HIGHLIGHT_STYLES[default]=none
ZSH_HIGHLIGHT_STYLES[unknown-token]=underline
ZSH_HIGHLIGHT_STYLES[reserved-word]=fg=cyan,bold
ZSH_HIGHLIGHT_STYLES[suffix-alias]=fg=green,underline
ZSH_HIGHLIGHT_STYLES[global-alias]=fg=green,bold
ZSH_HIGHLIGHT_STYLES[precommand]=fg=green,underline
ZSH_HIGHLIGHT_STYLES[commandseparator]=fg=blue,bold
ZSH_HIGHLIGHT_STYLES[autodirectory]=fg=green,underline
ZSH_HIGHLIGHT_STYLES[path]=bold
ZSH_HIGHLIGHT_STYLES[path_pathseparator]=
ZSH_HIGHLIGHT_STYLES[path_prefix_pathseparator]=
ZSH_HIGHLIGHT_STYLES[globbing]=fg=blue,bold
ZSH_HIGHLIGHT_STYLES[history-expansion]=fg=blue,bold
ZSH_HIGHLIGHT_STYLES[command-substitution]=none
ZSH_HIGHLIGHT_STYLES[command-substitution-delimiter]=fg=magenta,bold
ZSH_HIGHLIGHT_STYLES[process-substitution]=none
ZSH_HIGHLIGHT_STYLES[process-substitution-delimiter]=fg=magenta,bold
ZSH_HIGHLIGHT_STYLES[single-hyphen-option]=fg=green
ZSH_HIGHLIGHT_STYLES[double-hyphen-option]=fg=green
ZSH_HIGHLIGHT_STYLES[back-quoted-argument]=none
ZSH_HIGHLIGHT_STYLES[back-quoted-argument-delimiter]=fg=blue,bold
ZSH_HIGHLIGHT_STYLES[single-quoted-argument]=fg=yellow
ZSH_HIGHLIGHT_STYLES[double-quoted-argument]=fg=yellow
ZSH_HIGHLIGHT_STYLES[dollar-quoted-argument]=fg=yellow
ZSH_HIGHLIGHT_STYLES[rc-quote]=fg=magenta
ZSH_HIGHLIGHT_STYLES[dollar-double-quoted-argument]=fg=magenta,bold
ZSH_HIGHLIGHT_STYLES[back-double-quoted-argument]=fg=magenta,bold
ZSH_HIGHLIGHT_STYLES[back-dollar-quoted-argument]=fg=magenta,bold
ZSH_HIGHLIGHT_STYLES[assign]=none
ZSH_HIGHLIGHT_STYLES[redirection]=fg=blue,bold
ZSH_HIGHLIGHT_STYLES[comment]=fg=black,bold
ZSH_HIGHLIGHT_STYLES[named-fd]=none
ZSH_HIGHLIGHT_STYLES[numeric-fd]=none
ZSH_HIGHLIGHT_STYLES[arg0]=fg=cyan
ZSH_HIGHLIGHT_STYLES[bracket-error]=fg=red,bold
ZSH_HIGHLIGHT_STYLES[bracket-level-1]=fg=blue,bold
ZSH_HIGHLIGHT_STYLES[bracket-level-2]=fg=green,bold
ZSH_HIGHLIGHT_STYLES[bracket-level-3]=fg=magenta,bold
ZSH_HIGHLIGHT_STYLES[bracket-level-4]=fg=yellow,bold
ZSH_HIGHLIGHT_STYLES[bracket-level-5]=fg=cyan,bold
ZSH_HIGHLIGHT_STYLES[cursor-matchingbracket]=standout
#Color man pages
export LESS_TERMCAP_mb=$'\E[1;31m' # begin blink
export LESS_TERMCAP_md=$'\E[1;36m' # begin bold
export LESS_TERMCAP_me=$'\E[0m' # reset bold/blink
export LESS_TERMCAP_so=$'\E[01;33m' # begin reverse video
export LESS_TERMCAP_se=$'\E[0m' # reset reverse video
export LESS_TERMCAP_us=$'\E[1;32m' # begin underline
export LESS_TERMCAP_ue=$'\E[0m' # reset underline
這裏需要說明一下,很多alias那裏是用來取別名的,你可以根據需要自行增刪一些東西,比如
alias update="sudo apt update && sudo apt upgrade -y && sudo apt autoremove -y && sudo apt autoclean -y && sudo snap refresh"
這樣的命令
然後使用以下命令使更改生效
source ~/.zshrc
至此,美化配置就完成了,這裏沒有涉及更改主題、圖標、光標、字體之類的,感興趣的讀者可以自行研究一下gnome-tweaks(優化)這款工具
遊戲配置
英偉達驅動
在以往,安裝Linux的英偉達驅動堪稱地獄難度,不過好在現在很多主流Linux發行版已經對英偉達驅動有了很好的支持,比如Ubuntu在安裝時就可以選擇安裝英偉達驅動了,以及openSUSE可以一行命令直接安裝英偉達驅動並提供了suse-prime工具,還有manjaro和Pop!_OS就自帶了英偉達驅動,已經非常便捷了。
這裏以Ubuntu爲例,在“軟件和更新”這個應用中可以查看和選擇所安裝的驅動

然後可以使用英偉達提供的工具進行更高級的設置(這裏筆者使用的是X11而非Wayland)

這個工具裏面有這樣的一個設置,需要說明一下

默認情況下勾選上第二個選項即可,當你要玩遊戲的時候再切換到第一個選項,然後重啓即可生效
但是請注意,不建議日常使用時勾選第一個選項,因爲可能會存在一些兼容性問題,比如gnome桌面暗色樣式應用失敗,VMware workstation無法開啓虛擬機等問題。
安裝steam
去steam官網按下載按鈕即可自動下載deb安裝包。這裏再提供一個小技巧,在本文章開頭安裝的gdebi這個工具可以很便捷的安裝deb包,並一同安裝好依賴包。右鍵steam安裝包,選擇用gdebi打開,然後即可安裝了。
安裝完deb包還沒完呢,打開steam後還會讓你安裝一堆東西,根據提示進行操作即可。
基本設置
當你第一次進去steam主界面後會發現是英文的,這裏就需要去steam設置裏面調整一下了。或者你用得慣英文也行()
根據如下圖所示進行設置,然後重新啓動steam即可

你也可以在這裏開啓proton兼容層

如果你開啓兼容層,那麼絕大多數僅Windows端的遊戲就可以運行在Linux上了,當然性能肯定會有損失,至少能玩了對吧
然後如果你在原生支持Linux遊戲上遇到了顯示問題,也可以強行讓它運行在兼容層上來解決。比如饑荒聯機版的中文顯示就會亂碼,但是你去這個遊戲的屬性界面強行讓其運行在兼容層上就顯示正常了。

Minecraft Java版
目前僅有HMCL支持了Linux,PCL2還無法支持。先去HMCL官網下載Linux版,你會發現得到的是jar包,這裏就需要安裝java環境了。值得慶幸的是Linux安裝Java環境很簡單,不用額外去手動配置環境變量之類的,一條命令即可搞定:
sudo apt install openjdk-21-jre
然後找個合適的位置存放HMCL的jar包,或許你還需要去搞來一個它的圖標,待會兒要用到。
右鍵桌面在這裏打開終端
vim HMCL.desktop
然後按i進入編輯模式,粘貼如下內容,在第七行的java -jar 後面改爲你jar包的地址,在第八行等號後面改爲你圖標的地址,依葫蘆畫瓢。
[Desktop Entry]
Encoding=UTF-8
Name=HMCL
Name[zh]=HMCL啓動器
GenericName=Hello Minecraft! Launcher
Comment=A launcher to start Minecraft
Exec=java -jar /mnt/Data/Minecraft/HMCL-3.6.dev-1f7b156.jar
Icon=/mnt/Data/Minecraft/icon.png
Terminal=false
Type=Application
Categories=Application;Game;
按Esc鍵退出編輯模式,然後在英文狀態下輸入“:wq”(注意是雙引號內的全部內容,含冒號)
好了,現在你就可以從桌面啓動HMCL了。需要說明的是,HMCL下載的遊戲本體會安裝在你home文件夾中的.minecraft裏。
結語
希望這篇文章能夠對你有所幫助。
更多遊戲資訊請關註:電玩幫遊戲資訊專區
電玩幫圖文攻略 www.vgover.com

![[3.18]春促結束倒計時!盤點45款史低精品遊戲,含大量新史低!](https://imgheybox1.max-c.com/web/bbs/2025/03/18/527185751080e91c4c82b126d0c61b23.jpeg?imageMogr2/auto-orient/ignore-error/1/format/jpg/thumbnail/398x679%3E)


